Air leakage control is an important but commonly misunderstood component of the energy efficient house. Tightening the structure with caulking and sealants has several positive impacts. A tight house will:
- Have lower heating bills due to less heat loss
- Have fewer drafts and be more comfortable
- Reduce the chance of mold and rot because moisture is less likely to enter and become trapped in cavities
- Have a better performing ventilation system
- Potentially require smaller heating and cooling equipment capacities.
International Energy Conservation Codes (IECC) have significantly stepped up requirements for limiting building air leakage and duct leakage. Blower door testing must be performed to verify air leakage limits.
Meeting these stricter requirements needs deliberate effort. Kinzler Construction Services specializes in air sealing, insulating and performing blower door tests.
We recently spoke to certified building science expert and Kinzler Operations Manager, David Valenzuela, who shares tips for helping you ace your blower door test.
What is a blower door test and how does it work?
DAVID: Air leakage testing is now required to ensure that new buildings use less energy to heat and cool the home. A tight home is an efficient home.
Air leakage testing involves performing a blower door test on the building to determine how leaky the home is.
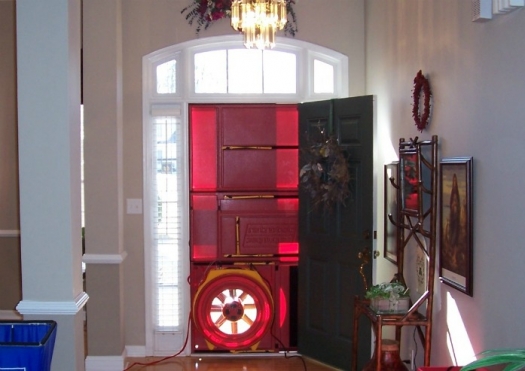
To conduct a blower door test, we place an infiltrometer or blower door fan in the main entry doorway to depressurize the house or suck out air from the interior. This process will cause outside air to be drawn into the house through leakage points.
The new codes are fairly strict and attention to detail during construction is required to pass these tests.
OK, so what do you recommend to contractors who want to pass these tests the first time?
DAVID: In my experience, there are seven key areas to address with air sealing in order to have success passing the blower door test. They include:
- Ductwork
- Transfers
- Bath Fans
- Outlets
- Attics
- Exterior Penetrations
- Installing Top Plate Gaskets
Please walk us through what needs to be done in each of these areas.
DAVID: Absolutely.

Ductwork: The ductwork from the furnace to your registers need to be 100% sealed around all joints. I see a lot of ductwork where the boot at the furnace is broken or missing mastic. Check the seams around elbows and wherever there are long trunk lines. Your returns should be ducted as well and not just run using the wall cavities. Using wall cavities as returns allow air to rush in from the attic or mid floors. Using ducted returns ensures it’s sealed and won’t pull air from other areas. The duct for the range should also be sealed using mastic.

Transfers: The transfers at room entrances can be sealed around the framing on both sides using sill sealer or a flexible gasket. You can also seal these after drywall if you prefer using Spray foam or caulking if the opening is big enough.

Bath fans: Bath fans should be installed using a damper with some type of gasket. Cheaper bath fans do not have a damper with a gasket and allow a lot of air to flow through. The bath fan housing should be sealed to the drywall. Any opening in the bath fan that isn’t being used should be sealed as well – I normally see holes in the cheaper bath fan housings.

Outlets: Outlets allow air to flow through the knockouts and the lines coming in. Sealing the back of the outlets at the knockouts and lines coming in with canned foam helps prevent air from flowing in. The foam might shrink or lift off the surface, these should be inspected after the foam has hardened to ensure you have a proper air sealed outlet. The outlet box should be sealed to the drywall. This applies to all outlets in the home – exterior, interior, ceiling boxes, and non-airtight can lights.

Attics: Attic air sealing is done before blow-in insulation is completed. The drywall is sealed to the framing using canned foam or another type of sealant. This will eliminate the need for a top plate gasket since the top plate will be sealed to the drywall on the attic side. Also, any penetrations through the drywall will also be sealed to prevent air flowing in the home. So the need to seal drywall penetrations from the top floor ceiling will be taken care of. If the attic is large in size, this would be the best option. Smaller attics should use other methods mentioned to ensure all will be sealed.

Exterior penetrations: Penetrations such as exhaust ducts, plumbing, electric cables, and gas lines are normally air sealed using foam during the draftstop process. Air still flows through the gaps between the plywood and studs. The gap at the top, bottom, and sides of stud bays can be sealed using canned foam or caulking to prevent air coming through. Spraying 1” of Spray Polyurethane Foam to your exterior walls and box sills will effectively seal all of these areas and prevent air from flowing in. Windows should always use caulking or window and door foam. Stuffing fiberglass around the window will only filter the air coming in.
Installing Top Plate Gaskets: Top plate gaskets help out a lot and are called out on most multi-family buildings we do involving smaller finished areas. 3.5” sill sealer or a liquid applied top plate gasket prevents air flow down the drywall from an attic space or mid floors. The gasket is applied to the face of the top plate before drywall is installed. The drywall will compress the gasket creating an air tight seal. The top plate gasket can also be applied to the face of the bottom plate to prevent any air coming in from the exterior sheathing. The drywall can also be caulked or foamed using canned foam to the bottom plate or plywood. 1” gypsum concrete will also create this air tight seal along the bottom plate to drywall, but can leak a little if the gypsum concrete shrinks while drying. The only issue I’ve seen while using the sill sealer as a gasket is when other trades remove or pull on it. Most of the time they don’t put it back in place.
That’s pretty thorough! Should all of these be done on every job?
DAVID: No, doing all of these things is not necessarily needed to pass a blower door test. That’s why Kinzler Construction Services offers different levels of air sealing service, depending on the job.
Blower door tests are based on how often the volume of air in conditioned space is exchanged per hour. When the conditioned area is in the hundreds of square feet, consider doing most of the suggestions listed above. When the conditioned space is above 2,500 square feet or so, you can skip a lot of the detailed work and focus on the main areas such as box sills, attic air sealing and top plate gaskets.
If your furnace is in unconditioned space, then it should definitely be inspected and tested. If you have a party wall, then 1” spray foam around the box sills, a top plate gasket, and sealing the drywall to floor should be done.
This is great information. How do you know so much about this?
DAVID: I’ve been doing this work out in the field for years! I also have several certifications from the Building Performance Institute so that I can help our customers by:
- Performing comprehensive energy audits and offer recommendations to save energy, improve comfort and increase a home’s safety and durability.
- Performing blower door and duct leakage tests on new homes, as required by IECC 2009 and IECC 2012 building codes.
- Resolving problems related to the building shell, such as moisture, ice dams, mildew and drafts.
Thank you, David! We appreciate your time.
DAVID: I’m happy to help. The good news about these newer energy codes is that they pay building owners back by way of reduced operating and utility costs down the road!